Silver Lake Hip Chicks - Raising Backyard Chickens in Urban Los Angeles
Wednesday, January 23, 2013
Saturday, January 5, 2013
Happy 2013 - the year of the egg! (hopefully...)
The turn of the year brought the chickens' three-month birthday. This is one of their biggest milestones, only to be upstaged by their first lay. Three months marks the transition to developer feed, and also the point when chickens are supposed to be close to adult-sized. They no longer require medicated feed because at this point they should have developed immunity to coccidia. Their new feed is lower in protein than their starter feed, which slams the brakes on their rampant growth. But they are not quite ready for the calcium-enriched layer feed that can be toxic to birds of their age. In other words, they are all grown up! (almost).
In coop management news, the half coffee chaff/half pine shavings deep litter method is working great, and the odor is de minimis. We had a minor incident where one of the roosts came off of the holder, but nothing a quick screw and drill can't fix. However, December rains in Los Angeles have brought with them muddy floors that wash away the straw and cause it to pile at the bottom of the sloped run. After doing some quick research, we have decided to add a layer of gravel to the run floor for drainage and friction, topped with a fresh layer of straw to help soak up the droppings. This project is in the works so stayed tuned.
The rains also revealed another problem: keeping the food dry and mold free. We have temporarily used a tent tarp to cover the run (and food) during the rain, but are working on a shelter for the food. This morning, we walked down to Michletorena Elementary School's community garden. They have an open house every Saturday morning, and welcome the community to work on the garden and enjoy each other's company. We were able to go inside the coop and inspect their design. It is a beautiful coop and a well thought-out design with superb execution, and we intend to replicate their food shelter design in the coming weeks.
And alas, here is the chickens' three month glamour shots! (Excused the lettuce and beet greens they were snacking on!)
Duchess drinking water
Woodstock being her gorgeous self
Vivian as adventurous as ever
Charlotte keeping it classy in her black and white
Monday, November 26, 2012
Happy Two Months Teenage Chickens
The chickens are happily foraging our kitchen scraps in their new run and I even saw evidence that they are roosting at night! (Aka poop on the roost.) Despite the now 3 month wait until they start laying, they are highly entertaining and earning their keep with their hilarious antics. Exhibit A: I looked outside this morning to see Woodstock INSIDE the feeder!! On further inspection, I realized that Vivian was in there with her! (no surprise there). Super funny, and a que that prompted Dan and myself to visit the feed and tack store to pick some more food!
Friday, November 16, 2012
Coop Building Phase III
Phase III: The run, the amenities, and everything else.
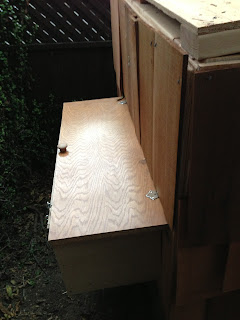
We added shingles to weather-proof the coop. Then Dan and Scott dug trenches around the frame of the run, installed the posts, and added the hardcloth. We ended up using hardcloth on the bottom and a plastic version of chicken wire on the roof to save money. We extended the hardcloth under the bottom of the coop so that the chickens could forage underneath the coop too. We attached the two nesting boxes and a thief door, and a spring-loaded hook and eye latch. We added two roosting poles inside the coop perpendicular from each other, one about a foot off of the floor and one about three feet off the floor. The ramp was given wooden slats to prevent the chickens sliding down from the ramp. Finally, we add the straw as litter in the run, coffee chaff and pine shavings as litter in the coop, and the door and latch. And (finally!) their new home is complete!
We added shingles to weather-proof the coop. Then Dan and Scott dug trenches around the frame of the run, installed the posts, and added the hardcloth. We ended up using hardcloth on the bottom and a plastic version of chicken wire on the roof to save money. We extended the hardcloth under the bottom of the coop so that the chickens could forage underneath the coop too. We attached the two nesting boxes and a thief door, and a spring-loaded hook and eye latch. We added two roosting poles inside the coop perpendicular from each other, one about a foot off of the floor and one about three feet off the floor. The ramp was given wooden slats to prevent the chickens sliding down from the ramp. Finally, we add the straw as litter in the run, coffee chaff and pine shavings as litter in the coop, and the door and latch. And (finally!) their new home is complete!
Dan and Scott installing shingles
The posts for the run after Dan and Scott spent the morning digging out a trench
Eddy thinks we are building a dog house!
Nesting box
Thief Door
Finished Product!
Thursday, November 15, 2012
Coop Building Phase II
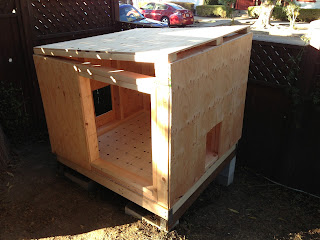
Phase II - Skin the walls, add the roof, and cut holes for the door, ramp, and nesting boxes. Not much excitement here, just had to put the work in.
Also, notice the sweatband Dan is rocking in these photos. We won that as a prize for being trivia night CHAMPIONS at Eagle Rock Brewery. (I couldn't resist mentioning it here, it was my first trivia night victory ever - so exciting!)
*Disclaimer - these pictures really make it seem like Dan did all the work. While he is wonderful and happily donated his newly discovered handyman skills, I also helped construct this little chicken mansion. (Does bringing cold beers count? I kid... I give back rubs too).

Adding the Wall Frames
Mounting the Wall Frames
Cutting the Wall Skins
We cut two 12x12 inch holes in the back for the nesting/thief box
All the skins are up.
Final touch this day was the ramp! The chickens will use this to greet the morning and to go home at night to roost. So excited about this amenity.
Wednesday, November 14, 2012
Coop Building Phase I
Sure, you could buy your coop online and have it assembled faster than an IKEA project, or you can DIY. I chose the latter - cheaper, more tailored to your specific space, customized to your specific needs, and just hipper. So...
Phase 1: The foundation. I honestly didn't think this step mattered much, but my designer and architect of the coop, my engineer twin brother Scott, thought otherwise. Apparently everything needed to be "level" and "bolted down." Seems easy enough right? My oldest sister Sherry will tell you otherwise! (It takes a village to raise chickens...). She spent her sweat, muscles, and probably some tears trying to level-out the slanted side yard comprised of rock-hard soil. She also suffered through many cat-calls at the local Home Depot. But eventually, we leveled off the ground, set our cinder blocks in place, bolted our 4x4 foundation beams to those blocks, and we had a foundation.
The second piece of this phase was building the floor. This involved reading Scott's highly detailed blueprints (yes, these were multi-page blueprints with detailed measurements, diagrams, and photographs. Think HGTV). While the designs required some translations for the average lay person, for example,
how to "mount" the frame (this was cleared up with a quick phone call to dear old Dad - again, it takes a village), the designs were otherwise flawless and we set to work. We attached a piece of plywood to the frame of the floor, secured the base to the foundation, and then laid the cheapest vinyl flooring we could find at the Depot. I chose vinyl flooring because it will make my bi-annual cleaning of the coop much easier.
Phase I Complete!
Drilling the cement blocs
Building the floor frame
Mounting plywood to the floor frame
Attaching the floor frame to the foundation, and spreading glue
Laying the vinyl floor
Tuesday, November 13, 2012
The Ladies Move To The Hen House
While Dan and I were away last weekend celebrating his birthday in Santa Barbara, Scott finished the final touches on the coop and run (nesting box roof, door to the run, and covering some holes with hard cloth). So, on the chicken's 6th week-old birthday, we decided to move the chickens outside to their newly finished coop. The weather was forecasted to drop to around 50 degrees, and I was confidant that the fully feathered chicks could handle it. We blocked their coop door so that they wouldn't wander into the cold at night without being able to find their way back. In doing so, we created conditions similar to their brooder box but just a little bigger. It was a bit stressful worrying whether the coop would adequately protect the chickens from local predators such as racoons, but all 4 were happily accounted for in the morning!
Woodstock was the first to go into the brooder box from their mailing box, so it was only appropriate that she was the first in the coop.
Woodstock moving over
Vivian taking the plunge.
Dan insisted on moving Duchess into the coop himself.
All four chickens happily exploring away!
Charlotte's first perch!
Subscribe to:
Posts (Atom)


